Creating a Website
In this beginner’s guide, we will go through the simplest method of creating a statically generated website, which you can host anywhere easily, using Hugo.
What are static and dynamic websites?
Dynamic websites are websites that generate content on-the-fly, tailored to each user’s request. Unlike static websites, which serve the same page every time someone visits, dynamic sites pull data from a database or other sources to create unique pages for each visitor.
For example, when you visit a blog powered by WordPress, the site dynamically pulls the latest posts, comments, and user information from its database to display a personalised experience. This ability to change content in real-time is why dynamic websites are used for e-commerce sites, social media platforms, and other websites where user interaction and fresh content are essential.
However, for the vast majority of website concepts on the Internet, there is no need for all of that complexity and dynamic processing. Presumably, you are reading this guide in order to set up a personal blog, or some other simple website to that effect. Consider the following diagram:
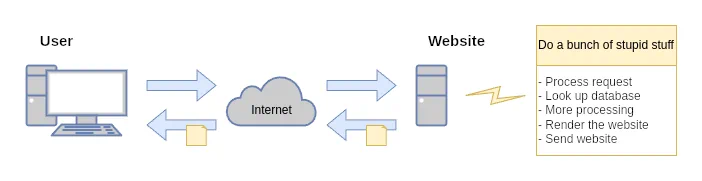
Clearly this makes sense for something like Facebook or a phpBB forum, but if you are looking to set up a blog, then this is not the infrastructure to use. Yet WordPress is used for this purpose all the time – it’s not at all necessary.
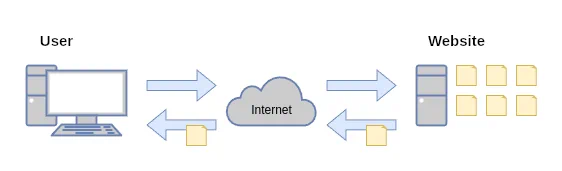
On the other hand, static websites are essentially files (like HTML, CSS, and images) stored on a server. When someone visits the website, their browser requests these files over the Internet and displays them for the user. Since there’s no need for server-side processing, static sites load quickly and are straightforward to maintain.
Why a static site over something like WordPress?
One of the most compelling reasons to choose a static site generator is speed. Unlike dynamic websites, which generate content on-the-fly for each visitor, static sites are already on the server, waiting to be served.
Security is another area where static sites shine. Since static sites don’t rely on server-side processing or databases, they are inherently less vulnerable to security breaches. There’s no login portal for hackers to exploit, and fewer moving parts mean fewer potential points of failure. In contrast, platforms like WordPress require regular updates and maintenance to patch vulnerabilities, which can be time-consuming and technically challenging for those who aren’t familiar with managing servers or databases. There’s just more headaches. You got a whole technology to learn, unlike static websites, which are just plain files on your filesystem.
Efficiency is another key advantage of static site generators. Platforms like WordPress often require expensive hosting solutions with high resource limits. With a static site, you don’t need powerful servers because the heavy lifting is done during the initial build phase.
Simplicity is another one. Gone are the days of dealing with complicated plugins, themes, and updates that are common with CMS platforms like WordPress. With Hugo, you don’t have to worry about PHP installations, MySQL databases, or server configurations. Instead, you focus on writing content and structuring your site in a way that feels natural to you. As said, it’s just files on your filesystem.
Finally, static sites are often more SEO-friendly than their dynamic counterparts. Search engines love static content because it’s easy to crawl and index. Since there’s no complex code running in the background, your site can load faster and deliver a better user experience, both of which are important factors in search engine rankings. Additionally, many Hugo themes come with built-in SEO optimisations which search engines prefer.
How do you have a search bar?
As you probably noticed, this website has a search function. Given this information, you might be inclined to think that this website is dynamic. What if I told you that this is not the case. “How is this possible?” you may ask.
On a static website, such as this one, the search function works differently from how it does on a dynamic website like WordPress. Since there’s no server involved to process your search query in real-time, the search is handled entirely by JavaScript running in your web browser.
When you load this website, the JavaScript code along with the content and metadata of other pages is already embedded into the webpage. This means that the search functionality doesn’t need to send your request to a server; instead, it simply looks through the data stored in the JavaScript files on your local browser. When you type a keyword into the search bar, the JavaScript listens for your input and quickly scans through the stored content and metadata to find matching results. These results are then displayed on your screen without needing any server processing whatsoever. Lastly, this is all handled by the theme that this website implements; no manual work goes into this.
Using such creative solutions, it is possible to have features on a static website that are ordinarily found on dynamic websites. All this to say: static websites are far better than dynamic ones.
Nature of this guide
In this guide, we will not be going through every single aspect of Hugo, since there’s plenty of resources available on this subject. Hugo documentation itself is beginner-friendly enough to be understandable to those who are new to the concept. Instead, we will go through some high-level basics for those who have never used a static web generator before, or even hosted a website before. That way, we can provide an adequate starting point to branch out from – hopefully.
Introduction to Hugo
![]()
Hugo is one of the most popular free software static site generators available today. It’s written in Go (a programming language known for its efficiency) and is very simple to use. Here are some key features:
- Works on all platforms: Windows, macOS, and Linux.
- Plenty of themes: Hugo has a large ecosystem. As such, there’s many themes to choose from.
- Template-based design: Uses templates to define how your content will look. This makes it easy to customise themes, if you want to modify one you found, or to make one from scratch.
- Write in Markdown: Allows you to write content in Markdown, a lightweight markup language that’s easy to learn and use. No need for laggy WYSIWYG WordPress editors or other wheel reinventions. Looks something like the following:
# This is a title
Some text, and a list of things
- List item 1
- List item 2
## A header
With some `code text`
Important
Hugo is a command-line interface (CLI) program, which means that you need to interface with it using the terminal. On Windows, you will have to use PowerShell, which is not the same as Windows PowerShell. Command Prompt will not work.
Setting up Hugo
Hugo is a program, so we need to install it. It can be installed in different ways depending on your operating system.
For macOS users with Homebrew installed:
brew install hugoFor Ubuntu/Debian users:
sudo apt update && sudo apt install hugoWarning
Hugo in the Debian respository is very outdated. It is recommended to manually install the binary from Hugo’s GitHub repository instead.
For Fedora users:
sudo dnf install hugoNote
Hugo in the Fedora respository is slightly outdated. Some themes might depend on latest version of Hugo to work fully.
Once you have installed Hugo on your system, you can verify that it is
installed by running hugo version in your terminal, which should give output
like the following:
hugo v0.143.1 linux/amd64 BuildDate=2025-02-04 VendorInfo=gohugoioFundamentals of Hugo
Hugo is one of those brilliantly simple solutions, that is so simple it might be difficult to understand, if one is familiar with all kinds of unnecessary and complex solutions.
When you create a website using Hugo, you’re essentially telling it to take
your raw content – text files written in Markdown – and combine them with
templates, which define how your site looks, to build a complete,
ready-to-publish website. Unlike platforms like WordPress, where every page is
generated dynamically when someone visits your site, Hugo does all the work
upfront when you run hugo build.
By compiling your site once and serving those static files, Hugo simplifies web development while offering the flexibility to create sophisticated websites. The workflow is always something like the following:
Edit content
Set up your posts, articles, documentation, or whatever in the content
directory of your project, using your favourite text editor.
Compile website
Run hugo build, or just hugo, in your project. This process takes about 250
ms.
Deploy website
Deploy files from the public directory, where your complete website is
contained, to your hosting service.
Further details on the basics of Hugo.
Understanding the directory structure
Hugo projects – sometimes varying very slightly with the theme – follow a specific folder structure that organises content, assets, and configurations logically.
- _index.md
-
- my-first-post.md
- style.css
- header.html
- image.webp
- index.html
-
- my-first-post.html
config.yaml: Configuration file for Hugo, which dictates project-wide functionality and behaviour. Hugo supports YAML, TOML, and JSON formats equally, though the general preference is for YAML.content: Where all your website’s content (posts, pages, etc.) reside. Inside are the files you actually edit to modify the content of your website.themes: Contains the theme directories you choose to use.assets: Holds static files that override static theme files, like CSS stylesheets.layouts: Custom template files if needed, which can override theme layouts also. If you have a file here calledheader.html, and if the theme implements one, then yourheader.htmltemplate will override the theme one.static: Static files for your content. If you have a file here calledimage.webp, you access it in content by calling/image.webp.public: The default directory where Hugo builds your site for production, but it can be changed with the--destinationoption. These files are not meant to be edited; they are the complete website.
Understanding this structure is necessary in order for the website to compile properly, as Hugo depends on files to be in specific directories and subdirectories. More information on this can be found in the Hugo documentation.
Creating your first website
Let’s walk through creating a basic Hugo website, step-by-step.
Initialise a new Hugo project
Open your terminal/PowerShell and navigate to where you want to create your site. Run:
hugo new site my-site
cd my-site
Add content
Create your first page or post by running:
hugo new posts/my-first-post.mdThis creates a Markdown file in the content directory. Open it in a text editor and add your content:
+++
title = "My First Post"
date = 2023-10-01
+++
Hello, World! This is my first Hugo post.
The lines surrounded by +++ signs are known in Hugo as front
matter. They contain
metadata, define how a specific page should behave, and other things that might
be relevant on a page-by-page basis.
Select and install a theme
Most themes are hosted on GitHub, but you can find most of them here on Hugo’s website. Once you find one you like, use the links on the website to navigate to the theme’s repository and download it. You can either clone the repository using Git or download the ZIP file directly.
Download and place a theme in your themes directory. For example:
mkdir -p themes/hugo-theme-bootstrap
cp -R /path/to/theme/files/* themes/hugo-theme-bootstrap/
Update config.yaml:
theme: "hugo-theme-bootstrap"A lot of themes offer additional configuration options, such as colors or layout settings. Refer to the theme’s documentation for any specific requirements.
Build and serve the site
In your terminal, run:
hugo serverThis starts a local web server. Visit
http://localhost:1313 to see your site. Or, if you
used --bind=0.0.0.0, you can access it from other devices on your network.
The site will recompile and show changes whenever you make changes to the
files. This makes iterating upon the website very quick and easy.
Customise your site
Modify the configuration files, add your own CSS/JS, or create additional content as needed.
The config.yaml (or .toml) file is where you set global preferences for your site:
title: "My Hugo Website"
description: "A beautiful static website built with Hugo."
author: "John Doe"
baseURL: "https://mywebsite.com/"
languageCode: "en-us"
timezone: "UTC"
title = "My Hugo Website"
description = "A beautiful static website built with Hugo."
author = "John Doe"
baseURL = "https://mywebsite.com/"
languageCode = "en-us"
timezone = "UTC"You can also configure settings like Disqus, social media links, etc., depending on the theme’s capabilities. More on project configuration here.
Unless you are very unfamiliar with the CLI, in which case you may not be able to fully comprehend the above steps, you should have a fully functional website after following these steps.
Perhaps the easiest way of getting the hang of Hugo would be to go through the
project you are viewing right now: this very website itself, which is hosted on
my GitHub repository, and can
be viewed by anyone. Due to how hosting a website through GitHub
Pages works, my website is stored in docs, not
the default public. Otherwise, it is a fully standard project, and should
give you an insight into how static websites work through simple, yet
distinctly elegant means.
Hugo’s documentation has a page on how to host on GitHub Pages. It is entirely free of charge, but you might also consider hosting fully independently like a landchad.
Working with templates
What we covered is just the tip of the iceberg. Should you want to modify an
existing theme, or even make a new one from scratch: Hugo uses Go templating
language to help automate compiling content. You can modify templates in the
theme directory or create custom layouts in your project’s layouts folder.
For example, to add a custom header:
<!DOCTYPE html>
<html>
<head>
  <title>{{ .title }}</title>
</head>
<body>
  <header>
    <nav>
      <ul>
        <li><a href="{{ .Site baseURL }}">Home</a></li>
        <li><a href="{{ .Site baseURL }}/about">About</a></li>
      </ul>
    </nav>
  </header>
  {{ .Content }}
</body>
</html>
More on this in Hugo’s documentation.
Adding Custom CSS/JavaScript
You can add custom styles and scripts by placing them in your theme’s assets
directory or within your project’s assets folder. For example:
- Place your
custom.cssinthemes/your-theme/assets/css/. - Include it in your layout template:
<link rel="stylesheet" href="{{ .themePath }}assets/css/custom.css">- Similarly, for JavaScript files:
<script src="{{ .themePath }}assets/js/custom.js"></script>